Search This Blog

Labels

restore (15) welding (4) dollies (1) electrical (1)

Thursday, May 30, 2013

Buying a welding machine

Here are some tips and knowledge I have condensed about buying a small garage welder.

Summary

I just spent about a month researching 110-120 volt welders. There are many choices and many details to consider. Make sure to learn a little bit about welding before you buy. Good place to start is looking at these terms Welding Terms

Go with a Italian or US made welder if you want a better quality. If you are worried about cost than Chinese is the way to go.

110/120 volt --- 135 -140 amp welders
Eastwood 135 chinese made - gets pretty good reviews and is backed by 3yr warranty $299 - You can get free shipping if you sign up for there mailing list. You may have to wait a few days they will send you a coupon.
The lincoln "Pro" line is Chinese. $320 These are the ones at Home Depot. 
The Lincoln Mig 10 Pak "Power" line is Italian. $429 on overstock + shipping 
Hobart Handler 140 made in USA (at least assembled here) Norther Tools $489 free shipping
Longevity Migweld 140 is Chinese. $329 on amazon free shipping with Prime
Miller (makes Hobart) made in USA - Didn't look to much at miller but they are pricy.


Tips
* Make sure to look at the Duty Cycle on any welder. None of these run 135-140 amps. The duty cycle stated, on most of these is 20% at 90 amps. This means you can weld for 2 minutes out of 10, with 8 min break. The duty cycle at 140 amps would be like 30 secs out of 10 mins. 

* Also be aware you will need a DEDICATED 20 amp circuit for any of these 135-140 amp / 110-120 volt welders. 

I just bought a Longevity Migweld 140. It had pretty good reviews and lots of options. Infinite adjustment on wire speed and power and the option for a spool gun for aluminum welding. 


http://www.longevity-inc.com/resources/welding-videos


Use
From my research these machines have the power to weld up to 1/8 steel. 3/16 is pushing the capabilities, especially for a novice. Learning some basic technics you will probably be good up to 1/8. Again all this depends on the skill level of he welder. 
Beveling and preheating metal before weld can allow you to achieve strong welds on thicker metal. Research and practice some advanced techniques before you work on and projects. There are some good videos on you tube.

Safety
Having the right gear is important also. Welding is dangerous. Fire and burns seem to be the biggest hazard. Get  a atuo-darkening helmet. Wear lots of leather, organic materials will protect you better. Leather is the best.
Know how your machine works. Undersand the basics of arc welding. 
Arc welding uses Current to produce heat. When the electrode from the spool gun touches the metal (your ground clamp is attached) it completes a circuit. Resistance in this circuit, particularly at the weld point, causes heat to build up very quickly. Heat also builds in the machine. This is why you have to follow the Duty Cycle

This is what I have learned over that past month of research. Now I need to learn to weld.

Thursday, May 16, 2013

Rear hatch restore

Step 1 get the rear hatch off the bus. It's pretty easy just 4 bolts. It's pretty heavy so be carefull.

Step 2 take off the panel on the inside of door. This is easy, there are some clips that can be popped out with a flat head screw driver. Be gental if you want to reuse.

Remove the lock from the rear hatch. There are three bolts start by removing those.


To get the lock out of the hole you will to first remove the little key on the back of the lock. It's held in by the philips head screw.

This is the key thing I am taking about.

Make sure to keep your parts together :)

Lock Removed. Now for the glass.

Posted some videos on removing the glass. The basic idea is to push the glass out from the inside of the door starting in a corner. While pushing wedge the rubber trim under the lip on the door frame. 
BE CAREFUL NOT TO BREAK GLASS!!!


Some may question why take the glass out at all. Well here is a perfectly good reason. This is where all the moister get trapped and the cancer starts. Glad I took it out now I can take care of this before it gets bad.


Thursday, May 9, 2013

Front End Rebuild

Rebuilding the vw bus front end doen not seem like to difficult a proposition. Parts seem plentiful and relatively cheap. My question is can it be improved and how easily. I plan to find out. Stay tuned.

Im looking for a front beam kit. Something to replace all those worn out bushings, bearings, tie rods, etc. But first a power wash is badly needed.


I would like to upgrade the front end to a more modern system. Items below are available but I have not yet done the research to know how well they work.

Camper suspension handling kit is something I want. It's supposed to improve handling. Also considering power steering rack. Not sure if there is a unit that exists OOTB.

I have made some progress on the suspension rebuild. I disassembled most of the front beam, including torsion arms, sway bar, shocks, steering arm and tie rods.

There are several parts I will leave in place including the needle bearings and the bushings. These should be replaced if the bearings or the internal beam tube is not well greased. In other words if you see lots of fairly clean grease the bearings are in good condition. Of course clean and replace grease.
Another thing is to check for play. If play exists it may well be easier to replace the beam.

How to determine the bearings and bushings are in good condition? How to determine if there is to much play? I will cover this in my next Front End post.

The torsion arm ball joints will be replaced and need to be pressed out with a special tool. Also the tie rod ends will be replaced as well as the steering pin that holds the steering nuckle to the beam. Also wheel bearing will be replaced.

I am having difficulty finding replacements for the torsion arm seals.

Engine Rebuild Part 1 - Parts Assembly and Purchase

I purchased my valve train from Jake Raby.
https://store.rabyenginedevelopment.com

From the reviews on thesamba.com and the general word around the community things should be real good. It's up to me to put it into action. 

Items Ordered:Price:
  •  1 of : 155 Piece Engine Hardware Kit #80
  • $49.00
  •  1 of : 2.0 Bus Gasket Set #28
  • $69.95
  •  1 of : 9590 Cam & Valvetrain Kit 9112
  • $557.69
  •  1 of : Camper Special Oval Port Cylinder Heads 7600
  • $1,695.00
  •  1 of : Camshaft Oil Plug #125
  • $3.69
  •  1 of : Front Pulley Seal #4
  • $9.95
  •  1 of : Input Shaft Bearing #10624
  • $9.95
  •  1 of : OEM Oil Filter #5112
  • $7.95
  •  1 of : Oil pressure relief piston 5084
  • $9.95
  •  1 of : Oil pressure relief screw 5088
  • $12.95
  •  1 of : Oil sump screen plate nut 5087
  • $8.95
  •  1 of : Oil Sump Screen-5096
  • $24.95
  •  1 of : Rear Seal #8
  • $14.95
  •  1 of : Type 4 Oil Pressure Sending Unit 5010
  • $10.95

    What I got (revised)
    Stock 2.0L case
    Stock Crank (Planning to send this to machine shop if necessary) w/bearing, gears and connecting rods.
    Stock crank gears 
    Main bearings (may purchase these new)
    Stock AA pistions (still in the box) for a Stock 2.0L. 
    Weber 40IDF jetted for Denver and higher altitude, set up for good milage  (venturi, emulsion, jets) 
    Custom dizzy from Aircooled.net for 40IDF & 2.0L setup.
    Original oil pump (thinking of conversion to type 1 oil pump)

    What I need (revised)
    Cam bearings
    Main Bearings
    Rod Bearings
    Permatex Gasket Sealent
    Permatex Thread Sealent
    Lint free towels
    Carb cleaner
    Assembly Lube
    Camshaft Bearing Lube

    Machine work
    I took my case and crank to Painters Grinding here in Denver CO. The are performing the following.
    Fixing the oil pick up threads where the bolt threads into the case
    Polishing the crank


    Tuesday, May 7, 2013

    Body Dolly


    The body is off to the blaster. The dolly survived the tow truck.

    Front dolly on bus. Seems to be holding up. I may replace the 5/16 bolt on the swivel arm with 3/8. I am going to pull this dolly apart again to clean and paint it.


    Mount complete with swivel and rotating sections


    Mounts with swivel arms.

    The frame mounts are almost done. This is the rotating mount. Next I will attach the forward back swivel. Why create such a complex mount? Two reasons; these mounts are height adjustable and they can be moved up serep incline such as a ramp.


    First body dolly almost done. I still need to build the mounts.


    I finished all the castor mounts.  I drilled holes for all the castors. Ended up using 5/8 drill bit to drill holes and ergo 5/8th nuts and bolts


    These are the castor mounts tach welded. I did not want to fully weld the brackets until I complete assembly at least once. To be sure everything fits together.

    ~~~~~~~~~~~~~~~~~~~~~~~~~~~~~~~~~~~~~~~~~~~~

    Also I chose to mount the front and rear dollies as separate units. They have the same design but with different mount points and mounts. I am designing for interchangeable mounts. See Below.


    Rear Mount Points about 44" apart

    Front Mount Point about 29" apart.


    You can download this design here Body Dolly
    Here is my latest design for the body dolly. It is a bit of a change but I think it is better, more efficient, easier to construct, cheaper, and should be just as strong. The primary question I am trying to resolve is what thickness of steel to use. I think 3/16 for the cross bars that connect the wheel caster supports. 12 or 14 gauge for the rest not sure about that yet. I am going to try to find some specs on the steel to try to get a better feel for it's strength. 


    I have created some initial designs with Sketchup. More to come as the designs evolve.

    ~~~~~~~~~~~~~~~~~~~~~~~~

    I have been having a mobility problem. Moving the bus body from my garage to a media blaster to a paint shop, back to my house, is a potential logistics nightmare. But I think I have a simple solution. A body dolly.

    The body dolly needs to be versatile enough to load on to trailer move around the garage and move around and over obstacles. Oh yeah and safe. Plus being able to move this around and out of the garage takes some pressure off and allows me to do other stuff with my garage.

    So being able to move around the garage is important and over small obstacles and also have some decent clearance. For this I chose 8" caster swivel wheels. These are available at harbor freight for 13.50 each.


    Disclaimer: Build this at you own risk. I have not tested this and cannot vouch for the structural integrity of these designs. Also your craftmanship is a factor. If you intended to support a very heavy object, you should test this out before you do anything stupid. Like getting underneath a car with this as the only support.

    Thursday, May 2, 2013

    The Mystery of Electrical Work

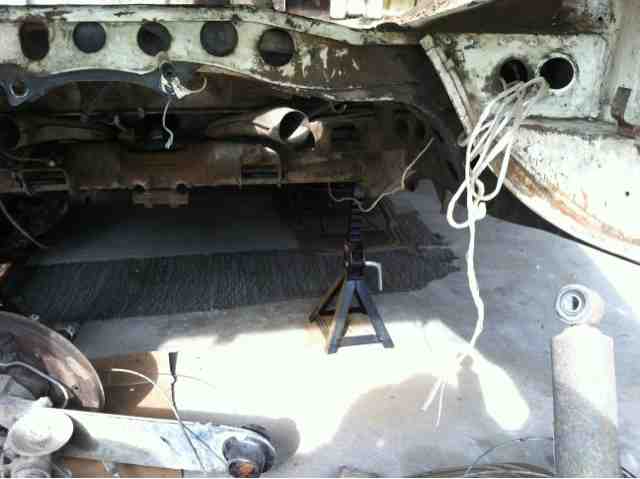
    I remove the wiring harness from the bus. I learned a cool trick form the Bug Me videos. You can simply tape rope or twine to the harness and other wires like the dome light wires then start pulling the wires through with the rope trailing. Make sure to leave the rope in so you can get the harness and wires back in position.