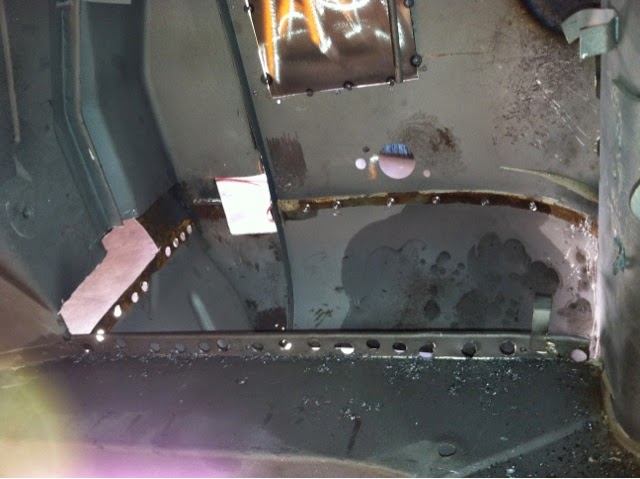
Disclaimer: I am not a professional. I know my work is a bit sloppy. I was just trying to get everything filled and keep it as strait as possible.
Search This Blog
Labels
Showing posts with label fabricate. Show all posts
Monday, October 13, 2014
Body Work Part 3
Disclaimer: I am not a professional. I know my work is a bit sloppy. I was just trying to get everything filled and keep it as strait as possible.
Labels:
73,
fabricate,
metal,
mig,
modification,
panels,
restoration,
restore,
riviera,
volkswagen,
vw,
weld
Monday, May 5, 2014
Body work - part 2
Cut out the battery tray and some other sections.

This is my attempt to shape the panel behind the battery tray.
I am glad I decided to cut the section below. It ended up having lots of dust sand and insulation in there that was rotting the metal.
Cut out a piece of the corner section tail light that was damaged in a fender bender.
Monday, October 7, 2013
Body Work - Part 1
Repairing the body panels is the first step to body work. Used the compressor and air gun to clean all the excess media from media blast. Girnded off all the left over body filler to expose metal. I will shape the metal with shrink disc and hammer and dolly to get a smooth level surface. Also replace panels that are not workable.
I have used the hammer and dolly on this section with some quick results. Tomorrow I will use the shrinking disc.

I need to prep the metal with wax and grease cleaner before welding to get a good connection.
The head lamp buckets can not be saved. I need to get new buckets to replace these crusty buckets.
Head lamp buckets are tacked in with about 5 welds on tabs located on the front panel. I drilled the welds out but it was tricky not to completely damage the tabs. I will reinforce the tabs before putting in new buckets.
I received new headlamp buckets from cip1 and they are a very close fit and match to the old buckets. Minus the holes drilled in the back of the buckets (for 67+ bug) all the tabs and mounts fit perfect.
http://www.cip1.ca/ProductDetails.asp?ProductCode=C21%2D0182
Links and Stuff
http://krayden.com/tds/henk_metalprep_79_tds.pdf
http://lib.store.yahoo.net/lib/stylespilotshop/metalprep-79-quart-msds.pdf
Evercoat gold body filler
Metal shaping tools
Mig gas
Thursday, May 30, 2013
Buying a welding machine
Here are some tips and knowledge I have condensed about buying a small garage welder.
Summary
I just spent about a month researching 110-120 volt welders. There are many choices and many details to consider. Make sure to learn a little bit about welding before you buy. Good place to start is looking at these terms Welding Terms
Go with a Italian or US made welder if you want a better quality. If you are worried about cost than Chinese is the way to go.
110/120 volt --- 135 -140 amp welders
Eastwood 135 chinese made - gets pretty good reviews and is backed by 3yr warranty $299 - You can get free shipping if you sign up for there mailing list. You may have to wait a few days they will send you a coupon.
The lincoln "Pro" line is Chinese. $320 These are the ones at Home Depot.
The Lincoln Mig 10 Pak "Power" line is Italian. $429 on overstock + shipping
Hobart Handler 140 made in USA (at least assembled here) Norther Tools $489 free shipping
Longevity Migweld 140 is Chinese. $329 on amazon free shipping with Prime
Miller (makes Hobart) made in USA - Didn't look to much at miller but they are pricy.
Tips
* Make sure to look at the Duty Cycle on any welder. None of these run 135-140 amps. The duty cycle stated, on most of these is 20% at 90 amps. This means you can weld for 2 minutes out of 10, with 8 min break. The duty cycle at 140 amps would be like 30 secs out of 10 mins.
* Also be aware you will need a DEDICATED 20 amp circuit for any of these 135-140 amp / 110-120 volt welders.
I just bought a Longevity Migweld 140. It had pretty good reviews and lots of options. Infinite adjustment on wire speed and power and the option for a spool gun for aluminum welding.
http://www.longevity-inc.com/resources/welding-videos
Use
From my research these machines have the power to weld up to 1/8 steel. 3/16 is pushing the capabilities, especially for a novice. Learning some basic technics you will probably be good up to 1/8. Again all this depends on the skill level of he welder.
Beveling and preheating metal before weld can allow you to achieve strong welds on thicker metal. Research and practice some advanced techniques before you work on and projects. There are some good videos on you tube.
Safety
This is what I have learned over that past month of research. Now I need to learn to weld.
Summary
I just spent about a month researching 110-120 volt welders. There are many choices and many details to consider. Make sure to learn a little bit about welding before you buy. Good place to start is looking at these terms Welding Terms
Go with a Italian or US made welder if you want a better quality. If you are worried about cost than Chinese is the way to go.
110/120 volt --- 135 -140 amp welders
Eastwood 135 chinese made - gets pretty good reviews and is backed by 3yr warranty $299 - You can get free shipping if you sign up for there mailing list. You may have to wait a few days they will send you a coupon.
The lincoln "Pro" line is Chinese. $320 These are the ones at Home Depot.
The Lincoln Mig 10 Pak "Power" line is Italian. $429 on overstock + shipping
Hobart Handler 140 made in USA (at least assembled here) Norther Tools $489 free shipping
Longevity Migweld 140 is Chinese. $329 on amazon free shipping with Prime
Miller (makes Hobart) made in USA - Didn't look to much at miller but they are pricy.
Tips
* Make sure to look at the Duty Cycle on any welder. None of these run 135-140 amps. The duty cycle stated, on most of these is 20% at 90 amps. This means you can weld for 2 minutes out of 10, with 8 min break. The duty cycle at 140 amps would be like 30 secs out of 10 mins.
* Also be aware you will need a DEDICATED 20 amp circuit for any of these 135-140 amp / 110-120 volt welders.
I just bought a Longevity Migweld 140. It had pretty good reviews and lots of options. Infinite adjustment on wire speed and power and the option for a spool gun for aluminum welding.
http://www.longevity-inc.com/resources/welding-videos
Use
From my research these machines have the power to weld up to 1/8 steel. 3/16 is pushing the capabilities, especially for a novice. Learning some basic technics you will probably be good up to 1/8. Again all this depends on the skill level of he welder.
Beveling and preheating metal before weld can allow you to achieve strong welds on thicker metal. Research and practice some advanced techniques before you work on and projects. There are some good videos on you tube.
Safety
Having the right gear is important also. Welding is dangerous. Fire and burns seem to be the biggest hazard. Get a atuo-darkening helmet. Wear lots of leather, organic materials will protect you better. Leather is the best.
Know how your machine works. Undersand the basics of arc welding.
Arc welding uses Current to produce heat. When the electrode from the spool gun touches the metal (your ground clamp is attached) it completes a circuit. Resistance in this circuit, particularly at the weld point, causes heat to build up very quickly. Heat also builds in the machine. This is why you have to follow the Duty Cycle.
Sunday, April 14, 2013
Hand break pivot pin
Only one more part to remove before sending the body to the media blaster. So far things have gone fairly smooth. I've of course ruined some minor parts while disassembling the bus. This can't be helped when you are a novice at restoring.
Any way the hand break seems to be the last part standing. This is because of the pivot pin. Which has come to my attention as "the dreaded hand brake pivot pin".
This thread says it all, I love thesamba.com it has everything. http://www.thesamba.com/vw/forum/viewtopic.php?p=6611843#6611843
I did end up cutting the pivot pin as recommended by samba forum. I used a grinder and almost cut my arm off as for the tight angle I had to work under. So I will have to drill the pin out of the hand break arm, and get a new pin. Looks like they can be had as mentioned in the forum or they are pretty easy for a shop to fabricate.
Any way the hand break seems to be the last part standing. This is because of the pivot pin. Which has come to my attention as "the dreaded hand brake pivot pin".
This thread says it all, I love thesamba.com it has everything. http://www.thesamba.com/vw/forum/viewtopic.php?p=6611843#6611843
I did end up cutting the pivot pin as recommended by samba forum. I used a grinder and almost cut my arm off as for the tight angle I had to work under. So I will have to drill the pin out of the hand break arm, and get a new pin. Looks like they can be had as mentioned in the forum or they are pretty easy for a shop to fabricate.
Subscribe to:
Posts (Atom)